YOUR CUSTOM AUDIENCE WITH FACEBOOK ADS MANAGER
Using Facebook Ads to get more sales has become the norm. Almost every business is doing it. However, not everybody is equally successful at it. There are many Facebook Ad mistakes businesses make. Not only that, but they’re not taking advantage of all the great features Facebook has.
One of them is custom audiences.
In this article, I’m going to teach you how to create a custom audience from an email list in Facebook Ads Manager. You’re also going to find out what are the benefits of custom audiences.
What is a Custom Audience?
A custom audience is an option in Facebook Ads Manager that allows you to find and target your existing audience on Facebook. You can import your audience data from different sources, including your email list.
What makes custom audiences so useful for marketers is that it makes targeting highly specific and thus drives more sales.
At the moment, Facebook allows you to create up to 500 custom audiences. However, make sure you follow Facebook Ads Manager updates. Things change quickly so you need to stay in the loop.
Types of Custom Audiences
- Customer list
- Website custom audiences
- App activity custom audiences
- Offline Activity custom audiences
- Engagement custom audiences
The Benefits of Creating a Custom Audience from Email List
- Better and more specific targeting
- Improved audience segmentation
- Successful remarketing
- Increase in sales and conversions
- More engagement
How to Create a Custom Audience from Email List in Facebook Ads Manager?
If people have signed up for your newsletter, that means you have an email list of potential or returning customers. You can use that information to create a custom audience in Facebook Ads Manager.
By doing that, you target those people who are already interested in your products or services with ads that are highly relevant to them. It is a great strategy for remarketing and getting more conversions because the targeting is very specific.
Here’s a step-by-step process of how to create a custom audience from your email list in Facebook Ads Manager.

Step 1
To create your audience, you first need to go to Facebook Ads Manager. Navigate to the assets section and select “Audiences”.

Step 2
Find the blue button and select “Create Audience”.

Step 3
Now you have the option to create an audience. Click “Custom Audience”.

Step 4
You’re going to see a list of different options that represent the audience source. There is website traffic, customer file, app activity, offline activity, video, Instagram business profile, lead form, events, instant experience, and Facebook Page. Choose “Customer File.”

Step 5
Now you’ll be presented with the option to upload a .txt or .csv file of your email list or to import your email list from Mail Chimp. Here’s how to do both.
How to Create a Custom Audience from Your File?
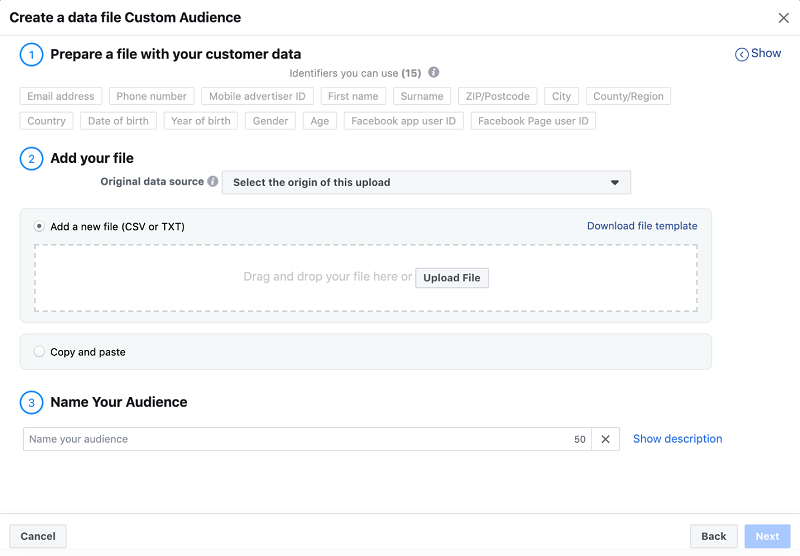
If you choose the option to create a custom audience manually from a data file, you first need to prepare that file. You can do that by following Facebook’s guide on how to prepare customer information. There are also other identifiers you can along with email address. Also, make sure you name your audience.

How to Create a Custom Audience by Importing Emails from MailChimp?
Another way to create a custom audience from an email list in Facebook Ads Manager is to import it from MailChimp. To do that, you first need to integrate MailChimp with Lead Ads Sync.
Go to Publishing Tools and select Leads Setup. Type in MailChimp in the search bar and click connect.
Then repeat steps 1 through 5 and choose “Import from MailChimp”.
Final Thoughts
As you can see, creating a custom audience from your email list is very simple, but has many benefits. That’s why it’s worth doing.
One last thing I want to emphasize is that you need to follow all the rules and regulations regarding privacy. To create a custom audience from an email list, you need to have permission first. If someone wants to be removed from your email list, you also need to remove them from your custom audience. Also, keep in mind that Facebook users can see if you have uploaded a customer list they’re on.
So, read Facebook’s terms of service regarding custom audiences and make sure everything is in line.